FlashEff2 | Complete manual
How to use | ActionScript 3.0 usage
Table of contents
- 1. About
- 2. Overview
- 3. Compatibility
- 4. Requirements
- 5. FlashEff2 License Types
- 5.1 Free Version (100+ Effect Presets)
- 5.2 Premium Version (3000 + Effect Presets)
- 5.3 Tweak Version (Fully Customizable Effects)
- 5.4 Premium Plus Version (Fully Customizable Effects; 3000+ Effect Presets)
- 6. Installation and Usage
- 6.1 Installation
- 6.2 Installing a Major Update of FlashEff2
- 6.3 Getting Started
- 6.4 Usage
- 7. FlashEff2 Patterns
- 7.1 FlashEff2 Pattern types
- 7.1.1 Symbol Patterns (prefix: FES)
- 7.1.2 Text Patterns (prefix: FET)
- 7.1.3 Button Patterns (prefix: FEB)
- 7.1.4 Command Patterns (prefix: FEC)
- 7.1.5 Filter Patterns (prefix: FEF)
- 7.2 Choosing a FlashEff2 Pattern
- 7.3 How FlashEff2 Patterns Work Together
- 8. Using the FlashEff2 Panel
- 8.1 Applying FlashEff2 Patterns
- 8.2 Previewing Your Work
- 8.3 Show Effects
- 8.4 Hide Effects
- 8.5 Filters
- 8.6 Buttons
- 8.7 Commands
- 8.8 Customizing and Saving Effects in the Premium Plus Version
- 9. Notes
1. About
FlashEff2 is a Flash CS3/CS4 ActionScript 3.0 component created by JumpeyeComponents to ease the animation process. It contains a collection of over 100 patterns, combined with thousands of presets, which enable cool show/hide transitions and interactive actions on visual objects and text.
As one of the best and most experienced Adobe Flash third party teams, we're committed to giving you the best animation scripts on the market. Even if you're totally new to Flash, you will find FlashEff2 easy with which to work because no coding skills are required. From the FlashEff2 Panel you will configure animations in seconds, just like you would in programs such as Apple Keynote or MS PowerPoint.
2. Overview
FlashEff2 is an improved version of the well-known FlashEff1 animation component. The concept is a snap: build in and build out an object (image, movie clip, or dynamic text field) using a single instance of the FlashEff2 Component. These animations are especially useful in intros, ad banners, and headers, but they may also be easily used in dynamic applications.
The FlashEff2 Panel is an online utility which loads inside your Flash CS3/CS4 IDE and constructs everything seamlessly between the FlashEff2 Component and your working library. Basically, its a configuration console and is the key tool which saves you time by making it easy to customize animations.
With a simplified workflow and redesigned setup panel, creating animations with FlashEff2 is now easier than ever before. The panel provides direct feedback of your work by letting you preview each pattern before choosing it, giving you an idea of what the effect will look like in your animation.
Once you choose a pattern, it is easy to change its settings to customize the effect and tailor it to suit your specific needs (the pattern/preset settings may be customized in the Tweak and Premium Plus version ONLY). Then, preview either the effect you have customized separately or the entire effect for your target object, including all the filters you have applied. In the Premium Plus version, you may also save your customized effects locally; every time you select that pattern, your custom presets will be displayed in the list of available presets.
In addition to animations, you may apply different static or animated filters to any visual object within Flash CS3/CS4. And, by using button presets, you can turn any visual element into an animated button which executes different actions - all with no coding whatsoever. FlashEff2 even allows you to perform commands and trigger actions on events such as rollOver, rollOut, release, press, or doubleClick with little or no coding required.
Note: Most of the patterns may be combined to create complex animated objects (show+ filter+button+hide).
Another benefit the FlashEff2 Component provides is less weight added to your .fla file than the previous version (FlashEff1), decreasing from 26Kb to only 19Kb. In so doing, FlashEff2 is more effective for banner ads and clips which usually have file size limitations.
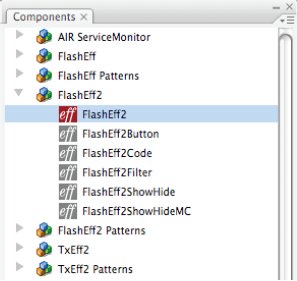
With this second version there are also a few new components included with the FlashEff2 package. These are FlashEff2 Light components which have specific functionalities. Each components performs only one of the functionalities of the FlashEff2 component: creating only show/hide effects (FlashEff2ShowHide), creating only show/hide effects on movie clips (FlashEff2ShowHideMc), applying filters (FlashEff2Filter) and creating buttons (FlashEff2Button). The FlashEff2Code component is used when the FlashEff2 Component should be applied using code.
Except the FlashEff2Code component, all the other Light components are stripped down versions of FlashEff2. FlashEff2Code has all the functionality of FlashEff2 plus the different types of tween and presets included so it can be used exclusively by code, just as FlashEff1 would be used.
3. Compatibility
ActionScript: 3.0
Flash IDE: Flash CS3, Flash CS4
FlashPlayer: Flash Player 9 +
4. Requirements
- FlashEff2 runs in Adobe Flash CS3 and CS4, AS3.0 only, on both Windows and Mac.
- A permanent Internet connection and a JumpeyeComponents.com account are required to run the FlashEff2 Panel.
- No coding skills are required unless you would like to use it in advanced/script mode; however, basic Flash CS3/CS4 knowledge is necessary.
5. FlashEff2 License Types
5.1 Free Version (100+ Effect Presets)
The Free FlashEff2 version gives you access to all the FlashEff2 Patterns in the package, but it only has a single default preset for each pattern you choose. In other words, it doesn't allow you to customize the effect settings. This version does not contain the FlashEff2 Light set of components and it cannot be used by code.
The Premium FlashEff2 version allows you to choose from a much larger range of presets than the Free version (an average of 10 presets per pattern) but, as in the case of the Free version, you are not allowed to customize the effect settings. Starting from this version, the package contains all the FlashEff2 Light components and it can be used by code.
5.3 Tweak Version (Fully Customizable Effects)
The Tweak FlashEff2 version, just like the Free version, gives you access to all the FlashEff2 Patterns in the package, each having a single default preset but it also allows you to make changes to the default settings. The package contains all the FlashEff2 Light components and it can be used by code.
The Premium Plus FlashEff2 version gives you full access to all the FlashEff2 Patterns and their presets, and it allows you to customize each effect by changing the values for the pattern properties - thereby creating countless effect combinations. The package has all the features of the Premium and Tweak versions and contains all the FlashEff2 Light components. It can also be used by code.
6. Installation and Usage
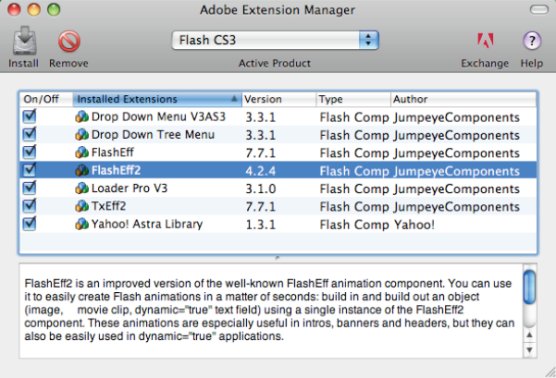
FlashEff2 consists of two parts: the Component itself and the component's Interface Panel.
The FlashEff2 Component (Window > Components) is the main part of the FlashEff2 System. It is the element which holds basic actions, and it controls and mediates between different objects and the FlashEff2 Patterns based upon the settings received from XML statements or directly from the FlashEff2 Panel.
The FlashEff2 Panel (Window > Other Panels > FlashEff2 Panel) is an online tool which loads within Flash CS3/CS4 itself (the Flash IDE). The FlashEff2 Panel is the interface you use to select, configure, and apply FlashEff2 effects. In other words, its the hands-on tool youll be using to create great Flash effects in your projects.
6.1 Installation
Installation requires Adobe Extension Manager Version 1.8 (Flash CS3) or Version 2 (Flash CS3 and Flash CS4). Adobe Extension Manager is freely available for download on the Adobe website at: http://www.adobe.com/exchange/em_download/.
Note: If you are installing a major update (i.e., you have been notified through the FlashEff2 Panel), please see Section 6.2.
- Download the FlashEff2 package from your JumpeyeComponents.com account page.
- Please be certain the Adobe Flash program is not running; if so, close it.
- Unzip/Unpack the files to a directory of your choice on your hard drive.
- The .mxp installation file is located in the main directory of the unzipped files.
- Launch the Adobe Extension Manager. If you have a prior Beta Version of FlashEff2, uninstall that extension.
- To install FlashEff2, open the .mxp file using Adobe Extension Manager and follow the prompts to complete the installation process.
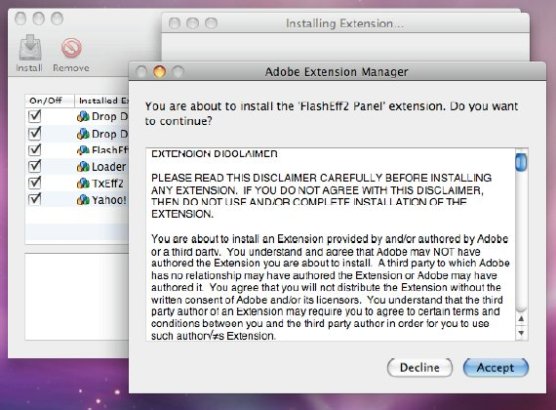
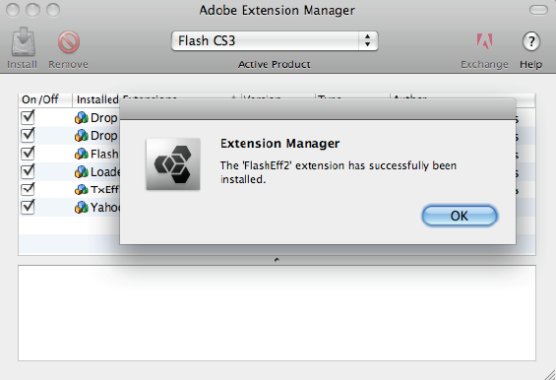
Please remember Adobe Flash must be closed for the installation to take effect. Once the component has been successfully installed, open Adobe Flash and you'll find the component and its patterns in the Components Panel (Window > Components) and the FlashEff2 Panel in the Window menu (Window > Other Panels > FlashEff2 Panel). The Panel is what youll use to configure your effects.
6.2 Installing a Major Update of FlashEff2
When major updates of FlashEff2 are released, the FlashEff2 Panel will notify and prompt you to download the new version. The Download now button will take you to the Downloads List in your JumpeyeComponents.com account. From there, download the package again, save it to your disc, and unpack it in a destination folder of your choice as before.
First, we recommend you close Adobe Flash CS3/CS4 (don't forget to save all your open files) and open Adobe Extension Manager. Then, select the older version of the FlashEff2 Component and uninstall it (press the remove extension button or File > Remove extension).
Second, go to the folder where you unpacked the FlashEff2 archive, find the FlashEff2.mxp file and install it (just double click on it and Adobe Extension Manager will begin the installation process). Follow the prompts to complete the installation.
Finally, once installed, close the Adobe Extension Manager and open Adobe Flash CS3/CS4. With any file open on which you were previously working, select one of the FlashEff2 Component instances and bring up the FlashEff2 Panel. Select Menu > Update fla to update all the FlashEff2 Patterns and the FlashEff2 Component from the library with the newly installed version. Please be patient as this process may take several minutes, depending upon the complexity of your project.
6.3 Getting Started
The FlashEff2 Component may be applied on Sprites, MovieClips, and Dynamic TextFields. This is the only component which needs to be in the display list/stage when creating effects. The other components, the FlashEff2 Patterns, only have to be in the library of your project; they don't need to be placed in the display list.
6.4 Usage
Lets take a look at general usage and an explanation of the patterns (Section 7) before we actually begin to work with the Component and Panel (Section 8). Using FlashEff2 for animation effects requires a few easy steps:
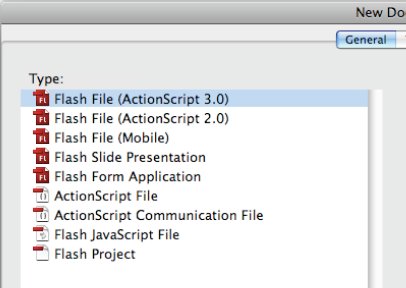
- Open Adobe Flash CS3/CS4 and create a new AS3 file: select File > New > Flash File (ActionScript 3.0).
- Next, create and/or place a target object you wish to animate on the stage (Sprite, MovieClip, or Dynamic TextField). If you do not specify an instance name for your clip or dynamic text field at this time, FlashEff2 will automatically assign one to it.
- Open the Components panel (Window > Components or Ctrl + F7 for Windows/Cmd + F7 for Mac OS).
- To apply a FlashEff2 effect on the target object (Sprite, MovieClip, or TextField), simply select the component from the Components panel (in the FlashEff2 folder) and drag it over the target object. It will automatically snap to the targets upper left-hand corner and also be added to your projects library.
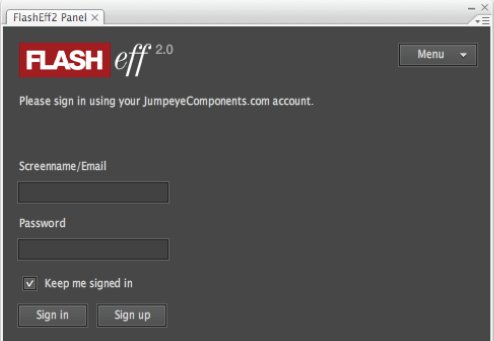
- Next, specify which of the FlashEff2 Patterns you want to apply through the FlashEff2 Panel. Make sure you have selected the FlashEff2 Component you just placed on the stage and open the FlashEff2 Panel (Window > Other panels > FlashEff2 Panel). Login to your JumpeyeComponents account if so prompted (requires permanent internet connection).
- If the FlashEff2 Component object is selected, the FlashEff2 Panel will display information for that component. In the FlashEff2 Panel, choose one of the patterns you would like to apply for the show, hide, filter, or button patterns from the corresponding lists. Once you select the pattern you like, it will be imported automatically by the FlashEff2 Panel into the library.
Note: The patterns and presets are displayed as lists of icons. Each icon is actually a preview of the pattern/preset. To see the animation of a pattern or preset, simply roll your mouse over the icon.

- Once you choose a pattern, you may customize it and test your file by hitting Ctrl + Enter for Windows or Cmd + Enter for Mac OS.
Note: From this point onward, to apply more FlashEff2 effects to other objects, simply drag the FlashEff2 Component from your library over the target objects (Sprite, MovieClip, or TextField); then, use the FlashEff2 Panel to configure your effects.
7. FlashEff2 Patterns
FlashEff2 uses scripts to generate all kinds of animations based upon the user's settings. These scripts are saved individually within the FlashEff2 framework as SWC files/components and are called "FlashEff2 Patterns."
For a FlashEff2 Pattern to work, it has to be imported into your library (the imported SWC resides in the Flash project library and is not imported as a separate AS file). The FlashEff2 Panel imports the pattern automatically after you select it in the FlashEff2 Panel.
7.1 FlashEff2 Pattern types
There are currently 5 types of FlashEff2 Patterns which may be grouped into 3 main types based upon the transitions they enable: show-hide (symbol and text patterns), buttons (button and command patterns), and filters (filter patterns).
7.1.1 Symbol Patterns (prefix: FES)
FES patterns are used for Symbol animation, which means the target objects are treated as single visual symbols. Basically, they can be used on any implementation of the DisplayObject class - usually MovieClips, Sprites, and Dynamic TextFields - very similar to the Jumpeye MCTE Show/Hide Transitions.
7.1.2 Text Patterns (prefix: FET)
FET patterns are for Text animations ONLY, which means the text is recognized as letters, words, or lines and is used by each FET pattern to create complex text animations. They can only be used on Dynamic TextFields (even html text) with Embedded Fonts and Anti-aliasing for Animation (very similar to TxEff).
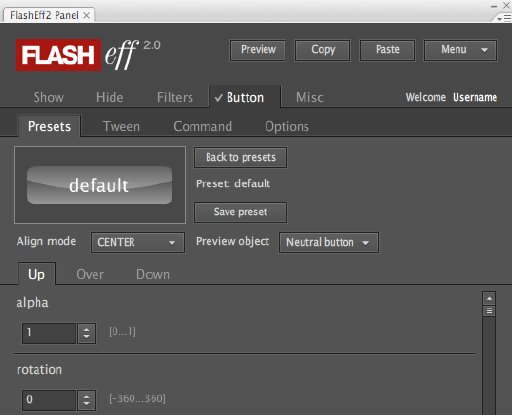
FEB patterns are used for turning any instance of a DisplayObject (e.g., MovieClip, Sprite, Dynamic TextField) into an interactive button.
The Button feature has changed from the previous FlashEff version. Now there is only one button pattern which allows you to apply different button states to your target clip. You may also customize each effect for any button state separately. All the button states have the same customizable settings: alpha transparency, rotation, changing x/y coordinates, changing the scaling values, blur filter, glow filter, color matrix filter, bevel filter, drop shadow filter and tint.
The button will go through the state effects using tween animations, which you may customize in the Tween tab, separately for each button state. You may have different values of the effects for each separate state, or you may choose to apply some of the effects on one state and other effects on another state.
7.1.4 Command Patterns (prefix: FEC)
FEC patterns, also called "Commands," allow you to use a button to trigger actions/commands on each event without writing any code from within the Button tab. You may also add multiple FEC patterns to a single button or add the same pattern many times to different or similar events (e.g., buttonSound, callFunction, gotoFrame, navigateToURL, switchObjects).
7.1.5 Filter Patterns (prefix: FEF)
FEF patterns are used for applying overall filters to any FlashEff2 visual object target instance. They will even be shown over the Show/Hide and Button transitions. Additionally, you may add multiple filters to a single instance and change the order in which they are applied over that instance.
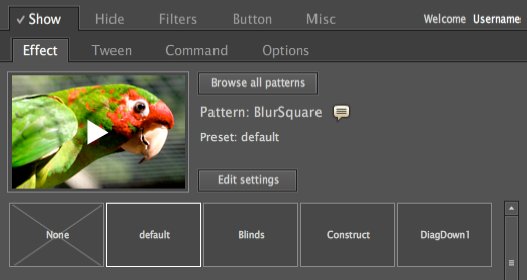
7.2 Choosing a FlashEff2 Pattern
The FlashEff2 Patterns are grouped together based upon the type of actions they produce (show, hide, filters, and buttons). Depending upon the type of effect you want to apply, select one of the Show, Hide, Filters, or Button tabs. Each tab contains another set of tabs used for selecting and customizing the pattern.
The Pattern tab contains the list of all the patterns included in that category. For the Show and Hide patterns, the Pattern tab contains two lists: one for Symbol Patterns and the other for Text Patterns.
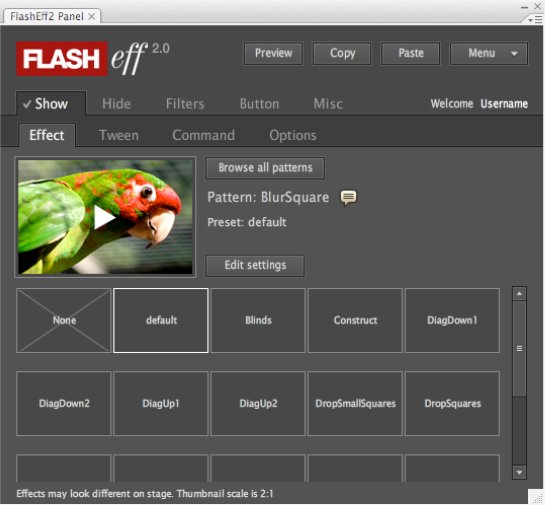
The patterns in the lists are displayed as icons which are actually previews of the effects. The previews are activated by rolling your mouse over the respective icons. To choose a pattern for the currently selected FlashEff2 Component, simply click it. This will open up the presets list for that pattern.

Note: The Free version of FlashEff2 has only one preset for each pattern; FlashEff2 Premium has several presets from which to choose; FlashEff2 Premium Plus allows full access to the pattern properties.
Once a preset has been selected or the effect parameters have been set, the current effect may then be previewed by clicking on the top-left viewing pane of the tab.
7.3 How FlashEff2 Patterns Work Together
On any object, the first thing you can apply is a show/hide transition. At the same level you may apply a button transition, but it will only work when the show/hide transition ends. Then, over the entire new object (containing show/hide and button transitions), the filter patterns may be applied.
Important! Due to individual characteristics of each pattern, we do not recommend the use of more than one type of pattern on the same object. However, the component allows this to occur, because in most cases blending different types of patterns on the same object actually works (i.e., the FlashEff2 Panel allows you to apply a maximum of 3 filters on the same target object).
Now, lets get to work and play!
8. Using the FlashEff2 Panel
8.1 Applying FlashEff2 Patterns
The easiest and most common way to apply FlashEff2 Patterns is by using the FlashEff2 Panel. From the panel you may select any patterns you want to apply to your target object, easily customize them, and preview the result of your pattern configuration.
- First, either select a FlashEff2 Component instance from the stage or drag an instance of the FlashEff2 Component to the stage over the desired object (Sprite, MovieClip, or Dynamic TextField). It should snap to the upper left-hand corner of the object.
Note: It is always good practice to start FlashEff2 animations on the second frame of the timeline, not on the first frame, so FlashEff2 has enough time to initialize and avoid unwanted flickering of the FlashEff2 Component instance - and possibly of the target object.
- Open the FlashEff2 Panel (Window > Other Panels > FlashEff2 Panel or Ctrl + F7 for Windows/Cmd + F7 for Mac OS). If prompted, log in with your JumpeyeComponents.com account username and password.
- Make sure the FlashEff2 Component is selected on the stage. In the FlashEff2 Panel, select the type of effect you want to apply (show, hide, filter, or button) from the appropriate tab. For show and hide effects, choose the type of pattern you wish to apply (symbol or text).
- The selected pattern has a number of existing presets from which you may choose (a single preset for the Free version and several presets for the Premium version).
- To customize the selected pattern further, you may change the property values in the Edit Settings section of that pattern (this feature is available only in the Premium Plus version).
- For each animation, filter, or button selected, the FlashEff2 Pattern is automatically imported into the library.
Note: After experimenting with more patterns, you will notice they have all been imported into your project library. If you want to get rid of the unused patterns, choose Menu > Optimize fla.
If you accidentally remove patterns from the library and youre not sure which patterns they were, you may use the Menu > Update fla option to let the FlashEff2 Panel scan your project. It will import the patterns which have been applied but are not found in the library.
Important! These operations are time consuming and use a lot of CPU power depending upon the number of FlashEff2 Component instances in your .fla file. Also, depending on the amount of FlashEff2 instances you've created, these operations may not import all the missing patterns or may not remove all the extra patterns, so it is always a good idea to check all the FlashEff2 patterns you used.
8.2 Previewing Your Work
The patterns and presets are displayed as lists of icons. Each icon is actually a preview of the pattern/preset. To view the animation of a pattern or preset, simply roll your mouse over the icon to see the example effect play.
To preview your selected pattern, along with any customization you may have made, each preset type has a preview pane area in the top-left corner of the corresponding tab.
- Show and Hide tabs: Preview your effects by clicking on the viewing pane.
- Button tab: Button effects may be previewed only by the Button > Pattern option, using mouse actions on the preview area (roll over, roll out, and press).
- Filter tab: The preview always has the filters applied.
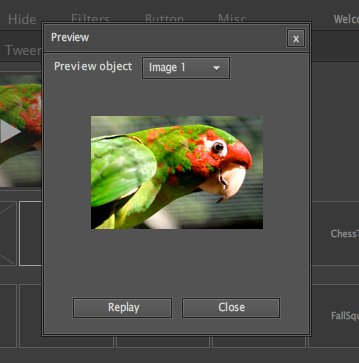
By selecting the Menu > Preview option, you may preview the entire effect applied on the target object (the show and hide effects along with all applied filters).
Premium Plus Version Only: With the FlashEff2 Panel you may save your effect settings on your local computer; the next time you select a pattern from the patterns list, your saved custom presets will be displayed among the other existing presets.
8.3 Show Effects
- In the FlashEff2 Panel select the Show tab (remember that a FlashEff2 Component instance from the stage must be selected first).
- Select the type of pattern you want to apply (symbol or text).
- From the patterns list, select the pattern you wish to apply.
- From the presets list, select the preset you want to apply.
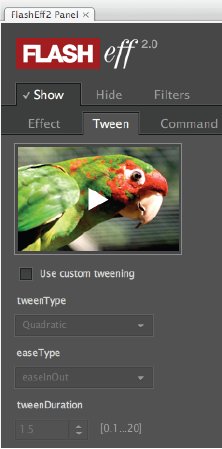
- To customize the animation, use the settings from the Tween and Options tabs.
Note: You may customize the effect further if you own the Premium Plus version, and you may also save it.
- If you test your Flash movie (press Ctrl + Enter for Windows or Cmd + Enter for Mac OS), FlashEff2 will apply your selected show effect.
- To remove a show effect from the FlashEff2 Component instance, deselect the preset or the pattern; return to the presets or patterns list and select the item None from that list.
8.4 Hide Effects
- In the FlashEff2 Panel select the Hide tab (remember that a FlashEff2 Component instance from the stage must be selected first).
- Select the type of pattern you want to apply (symbol or text).
- From the patterns list, select the pattern you wish to apply.
- From the presets list, select the preset you want to apply.
- To customize the animation, use the settings from the Tween and Options tabs.
Note: You may customize the effect further if you own the Premium Plus version, and you may also save it.
- If you test your Flash movie (press Ctrl + Enter for Windows or Cmd + Enter for Mac OS), FlashEff2 will apply your selected hide effect.
- To remove a hide effect from the FlashEff2 Component instance, deselect the preset or the pattern; return to the presets or patterns list and select the item None from that list.
8.5 Filters
- In the FlashEff2 Panel select the Filters tab (remember that a FlashEff2 Component instance from the stage must be selected first). In the Pattern tab you may select up to three filter patterns.
Select the first sub-tab. Tabs which do not have a filter preset selected will have the name "No filter." Tabs which already contain a filter will display the name of the selected filter preset. - From the filter presets list, select a desired filter (to preview an effect, roll your mouse over the preset).
Premium Plus Version Only: To customize the filter further, select the Edit settings button. By changing the property values, the filter will be updated automatically in the preview area. To save your new filter settings, select the Save preset button.
- To remove a filter from the FlashEff2 Component instance, deselect the preset from the presets list; return to the presets list and select the item None from that list.
- In the FlashEff2 Panel select the Button tab (remember that a FlashEff2 Component instance from the stage must be selected first).
- On the Pattern tab you'll find a list of presets for the button (the Free version contains only one preset but the Premium version lets you choose from several pre-configured presets). You may select one of the presets to apply the effect on the target object.
Premium Plus Version Only: You may customize the settings of the button behavior further by selecting the Edit settings and states button, and you may change the look of the button for each state.
- To remove a button effect from the target object, simply open the list of presets and select the item None from that list.
8.7 Commands
- Commands are applied from the Button tab; in the FlashEff2 Panel, select the Button tab (remember that a FlashEff2 Component instance from the stage must be selected first).
- Next, select the Command tab.
- To add a new command which is to be executed by the target object, press the "+" button to open up the list of commands from which you may select one or more items.
- Set up the command by changing the property values displayed in the right side of the panel. You may also set the mouse event which will trigger the selected command.
- To remove a command from the list, simply select the command and press the "" button below the list.
8.8 Customizing and Saving Effects in the Premium Plus Version
Once you select a pattern and the list of presets opens, you may choose a preset from the list. A preset is a pre-configured effect. The Premium Plus version allows you to further customize the pattern by setting each of the pattern parameters as you wish.
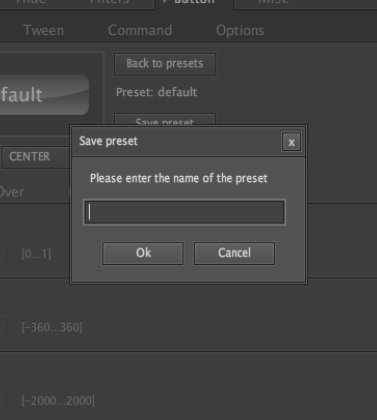
Once youve finished tweaking the pattern settings, you may save those settings as your own custom preset. Click on the Save preset button, give it a name in the opening dialog, and click the OK button. The next time you select the same pattern and the presets list appears, your preset will be among the existing ones.
Other settings may be done in the Tween and Options tabs, available for the Show, Hide, and Button patterns. Here you can set the type of tween the effect will have, the duration of the tween settings effect, the delay before the show/hide effect starts, and whether or not it will be applied automatically (for the Options of the Show and Hide effects). For the Options setting of the Button patterns, you may set the way the button is drawn and whether or not the hand cursor will be displayed on the button.
The Misc tab contains global miscellaneous settings for the component. It displays the instance name of the target object (you may "manually" change it from here if you like) and a setting for the target object's visibility (whether or not it is displayed before the effect starts). You may also set the URL of an .xml file whereby the FlashEff2 Component instance will be set up through your own custom .xml file.
Besides having the capability to use an external .xml file to set up the target FlashEff2 Component instance, you may also apply an XML statement by pasting it in the XML text box and selecting the Load button.
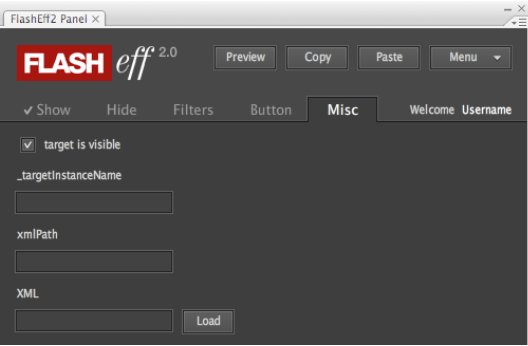
XML for the FlashEff2 Component may contain settings for multiple patterns: a show and hide pattern, up to three filters, button, and command pattern settings. When you load such an XML object, a dialog box will open asking you to confirm which of the patterns (specified in the XML) you wish to apply. By default, all of the patterns will be selected. To apply the XML object, simply select the Paste button in the dialog box.
9. Notes
Remember, it is always good practice to start FlashEff2 animations on the second frame of the timeline and not on the first frame. FlashEff2 will then have enough time to initialize and avoid unwanted flickering of the FlashEff2 Component instance and the target object.
We do not recommend using FlashEff2 with Flash clips which have multiple scenes. Flash movies do not work well with components in multiple scenes, especially complex components like FlashEff2. If you do have projects with scenes, as an alternative you may select both the target object and the FlashEff2 effect, turn it into a movie clip, then place that movie clip on the stage in the scene. However, we do caution against this practice, even though it does work.